这篇文章主要为大家详细介绍了iOS自定义滑杆效果,文中示例代码介绍的非常详细,具有一定的参考价值,感兴趣的小伙伴们可以参考一下
本文实例为大家分享了iOS自定义滑杆的具体代码,供大家参考,具体内容如下
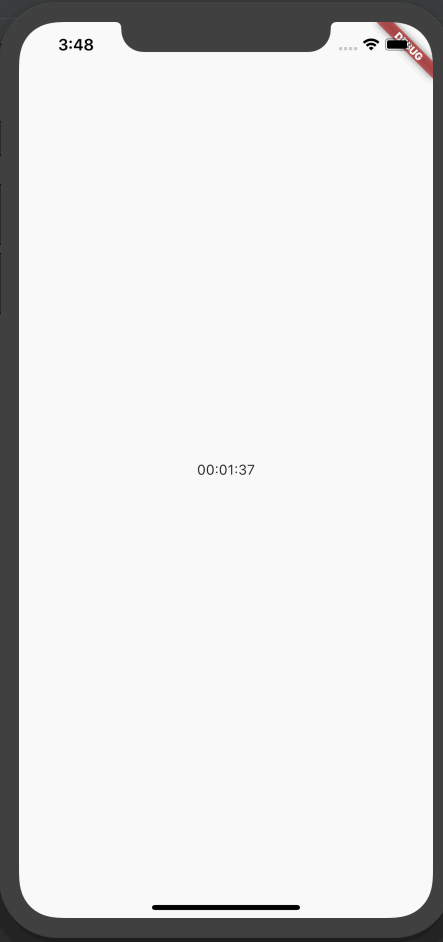
先让我们看看效果:

主要实现的代码:
UIImage *thumbWithLevel(float aLevel)
{
    float INSET_AMT = 1.5f;
    CGRect baseRect = CGRectMake(0, 0, 40, 100);
    CGRect thumbRect = CGRectMake(0, 40, 40, 20);

    UIGraphicsBeginImageContext(baseRect.size);
    CGContextRef context = UIGraphicsGetCurrentContext();

    [[UIColor darkGrayColor] setFill];
    CGContextAddRect(context, CGRectInset(thumbRect, INSET_AMT, INSET_AMT));
    CGContextFillPath(context);

    [[UIColor whiteColor] setStroke];
    CGContextSetLineWidth(context, 2);
    CGContextAddRect(context, CGRectInset(thumbRect, 2 * INSET_AMT, 2 * INSET_AMT));
    CGRect ellipseRect = CGRectMake(0, 0, 40, 40);
    [[UIColor colorWithWhite:aLevel alpha:1] setFill];
    CGContextAddEllipseInRect(context, ellipseRect);
    CGContextFillPath(context);

    NSString *numString = [NSString stringWithFormat:@"%0.2f",aLevel];
    UIColor *textColor = (aLevel > 0.5) ? [UIColor blackColor] : [UIColor whiteColor];
    UIFont *font = [UIFont fontWithName:@"Georgia" size:15];
    NSMutableParagraphStyle *style = [[NSMutableParagraphStyle alloc] init];
    style.lineBreakMode = NSLineBreakByCharWrapping;
    style.alignment = NSTextAlignmentCenter;
    NSDictionary *attr = @{NSFontAttributeName:font,NSParagraphStyleAttributeName:style,NSForegroundColorAttributeName:textColor};
    [numString drawInRect:CGRectInset(ellipseRect, 0, 6) withAttributes:attr];

    [[UIColor grayColor] setStroke];
    CGContextSetLineWidth(context, 3);
    CGContextAddEllipseInRect(context, CGRectInset(ellipseRect, 2, 2));
    CGContextStrokePath(context);

    UIImage *theImage = UIGraphicsGetImageFromCurrentImageContext();
    UIGraphicsEndImageContext();

    return  theImage;
}
在这里我们通过context的方法将图片画出了,对于性能有点要求,但是现在应该不在乎这点性能了
- (void)updateThumb
{
    if ((self.value < 0.98) && (ABS(self.value - previousValue) < 0.1f)) {
        return;
    }

    UIImage *customImg = thumbWithLevel(self.value);
    [self setThumbImage:customImg forState:UIControlStateHighlighted];
    previousValue = self.value;
}
通过滑块的值来使上面的值进行变化,更加的直观
[self setThumbImage:simpleThumb() forState:UIControlStateNormal];
  [self addTarget:self action:@selector(startDrag:) forControlEvents:UIControlEventTouchDown];
  [self addTarget:self action:@selector(updateThumb) forControlEvents:UIControlEventValueChanged];
  [self addTarget:self action:@selector(endDrag:) forControlEvents:UIControlEventTouchUpOutside | UIControlEventTouchUpInside];
对于不同的状态来进行不同的操作,让滑杆的用户体验度更加的完整
以上就是本文的全部内容,希望对大家的学习有所帮助,也希望大家多多支持编程学习网。
织梦狗教程
本文标题为:iOS自定义滑杆效果


基础教程推荐


猜你喜欢
- Flutter绘图组件之CustomPaint使用详解 2023-05-12
- iOS开发教程之XLForm的基本使用方法 2023-05-01
- 解决Android Studio突然不显示logcat日志的问题 2023-02-04
- Android多返回栈技术 2023-04-15
- Android开发使用RecyclerView添加点击事件实例详解 2023-06-15
- Flutter手势密码的实现示例(附demo) 2023-04-11
- android studio按钮监听的5种方法实例详解 2023-01-12
- Android中的webview监听每次URL变化实例 2023-01-23
- IOS 播放系统提示音使用总结(AudioToolbox) 2023-03-01
- IOS应用内跳转系统设置相关界面的方法 2022-11-20