这篇文章主要为大家详细介绍了Android使用代码动态生成界面,文中示例代码介绍的非常详细,具有一定的参考价值,感兴趣的小伙伴们可以参考一下
我们最常用使用XML来编写Android应用程序的UI,这样的好处是方便快捷可视化,而且维护和修改特别容易,但是它是静态的。如果我们要做的程序的界面是固定的,用XML固然是最好的选择,但是如果我们需要动态、灵活地控制UI,使用代码来动态生成UI无疑使最好的办法。
在XML中,我们使用的五大布局:LinearLayout(线性布局)、RelativeLayout(相对布局)、TableLayout(表格布局)、AbsoluteLayout(绝对布局)和FrameLayout(帧布局)在Android中也有对应的类来表示。
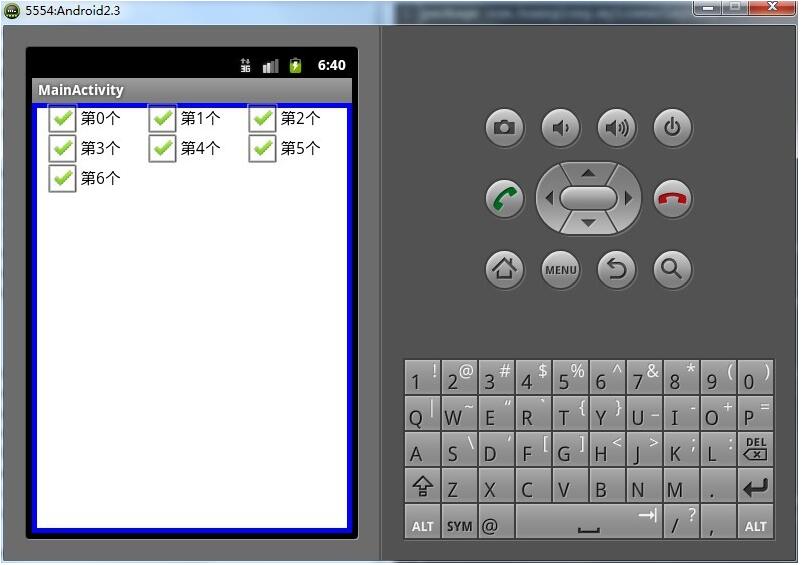
举个例子,我现在需要显示一个表格,表格的行数和列数及其内容都不确定,如果在XML中,这是不可能实现的。
先给大家看一下成品:(下面的代码只给大家展示如何实现,表格里面的内容忽略)

首先,新建一个不带任何控件的XML文件
<?xml version="1.0" encoding="utf-8"?>
<LinearLayout xmlns:android="http://schemas.android.com/apk/res/android"
    android:layout_width="match_parent"
    android:layout_height="match_parent"
    android:orientation="vertical" >

    <TableLayout
        android:id="@+id/tableLayout"
        android:layout_width="match_parent"
        android:layout_height="wrap_content" >
    </TableLayout>

</LinearLayout>
在代码中新建一个TableLayout:
// TODO 显示表格信息
 private void displayRegeditedInfo()
 {
  Iterator

     iterator = iterable.iterator();
  ICells

      iCells = GlobalVariable.manager
    .createPersonDataCells(IInspectionManager.CS_PERSON_LIST_CELLS);
  boolean flag = true;// 标题栏为true,内容栏位false
  int colorChange = 1;// 用来判断单双行,以显示不同的颜色
  TableLayout tableLayout = (TableLayout) findViewById(R.id.tableLayout);
  tableLayout.setStretchAllColumns(true);
  tableLayout.setShrinkAllColumns(true);

  while (iterator.hasNext())
  {
   // 行的样式
   TableRow.LayoutParams params = new TableRow.LayoutParams(
       ViewGroup.LayoutParams.WRAP_CONTENT, ViewGroup.LayoutParams.MATCH_PARENT);
   if (flag)// 首先显示表格的标题栏,内容自己定义
   {
    TableRow titleRow = new TableRow(this);
    for (int i = 0; i < colums; i++)// 列数
    {// 列名
     params.setMargins(1, 1, 1, 1);
     TextView textView = new TextView(this);
     textView
       .setBackgroundColor(getResources().getColor(R.color.top));
     textView.setTextColor(Color.WHITE);
     textView.setTextSize(31);
     textView.setLayoutParams(params);
     textView.setText(columsName);// 列名
     textView.setTextSize(30);
     textView.setGravity(Gravity.CENTER_HORIZONTAL);
     titleRow.addView(textView);// 把控件添加到行TableRow中
    }
    flag = false;
    tableLayout.addView(titleRow);// 把行添加到TableLayout中
   }

   // 新建一行,显示每个成员的具体信息
   TableRow personRow = new TableRow(this);
   for (int i = 0; i < lines; i++)
   {
    params.setMargins(1, 1, 1, 1);
    object; // 我在这里用Object代表表格显示的内容,
      // Object可以是字符串、数字,也可以是照片,看你具体的定义
    if (object instanceof String)
    {// 字符串居中显示
     TextView textView = new TextView(this);
     textView.setLayoutParams(params);
     textView.setTextSize(29);
     if (colorChange % 2 == 1)
      textView.setBackgroundColor(getResources().getColor(
        R.color.second));
     else
      textView.setBackgroundColor(getResources().getColor(
        R.color.third));
     textView.setText(object.toString());
     textView.setTextSize(30);
     textView.setGravity(Gravity.CENTER);
     personRow.addView(textView);
    }

    else if (object instanceof Number)
    {// 数字居右显示
     TextView textView = new TextView(this);
     textView.setPadding(0, 0, 5, 0);// 右内边距
     textView.setLayoutParams(params);
     textView.setText(object.toString());
     textView.setTextSize(30);
     textView.setTextSize(29);
     if (colorChange % 2 == 1)
      textView.setBackgroundColor(getResources().getColor(
        R.color.second));
     else
      textView.setBackgroundColor(getResources().getColor(
        R.color.third));
     textView.setGravity(Gravity.CENTER_VERTICAL | Gravity.RIGHT);
     personRow.addView(textView);
    }

    else if (object instanceof byte[])
    {// 显示头像
     TableRow.LayoutParams params2 = new TableRow.LayoutParams(60, 75);
     ImageView imageView = new ImageView(this);
     if (colorChange % 2 == 1)
      imageView.setBackgroundColor(getResources().getColor(
        R.color.second));
     else
      imageView.setBackgroundColor(getResources().getColor(
        R.color.third));
     Bitmap bitmap = BitmapFactory.decodeByteArray((byte[]) object,
       0, ((byte[]) object).length);
     imageView.setImageBitmap(bitmap);
     imageView.setLayoutParams(params2);
     personRow.addView(imageView);
    }

    else
    {// 空值
     TextView textView = new TextView(this);
     textView.setLayoutParams(params);
     textView.setTextSize(30);
     if (colorChange % 2 == 1)
      textView.setBackgroundColor(getResources().getColor(
        R.color.second));
     else
      textView.setBackgroundColor(getResources().getColor(
        R.color.third));
     personRow.addView(textView);
    }
   }
   colorChange++;
   tableLayout.addView(personRow);
  }
 }
还可以对整个布局、整行或某个空间添加监听事件,只需setId(int id),然后在设立监听器即可。
以上就是本文的全部内容,希望对大家的学习有所帮助,也希望大家多多支持编程学习网。
织梦狗教程
本文标题为:Android使用代码动态生成界面


基础教程推荐


猜你喜欢
- android studio按钮监听的5种方法实例详解 2023-01-12
- 解决Android Studio突然不显示logcat日志的问题 2023-02-04
- iOS开发教程之XLForm的基本使用方法 2023-05-01
- Android中的webview监听每次URL变化实例 2023-01-23
- IOS 播放系统提示音使用总结(AudioToolbox) 2023-03-01
- Android多返回栈技术 2023-04-15
- Android开发使用RecyclerView添加点击事件实例详解 2023-06-15
- Flutter绘图组件之CustomPaint使用详解 2023-05-12
- Flutter手势密码的实现示例(附demo) 2023-04-11
- IOS应用内跳转系统设置相关界面的方法 2022-11-20