这篇文章主要介绍了Android studio 广播的简单使用,本文给大家介绍的非常详细,对大家的学习或工作具有一定的参考借鉴价值,需要的朋友可以参考下
1.在布局文件里面加入按钮,等会发送广播
<?xml version="1.0" encoding="utf-8"?>
<LinearLayout
    xmlns:android="http://schemas.android.com/apk/res/android"
    xmlns:app="http://schemas.android.com/apk/res-auto"
    xmlns:tools="http://schemas.android.com/tools"
    android:layout_width="match_parent"
    android:layout_height="match_parent"
    android:gravity="center"
    tools:context=".MainActivity3">

    <Button
        android:id="@+id/send"
        android:layout_width="wrap_content"
        android:layout_height="wrap_content"
        android:text="发送广播"></Button>

</LinearLayout>
2.使用广播的第一步当然是创建一个广播接受者
public class MyBrodestReciver extends BroadcastReceiver{
        @Override
        public void onReceive(Context context, Intent intent) {
            //判断action是否为添加的action,如果是则toast
            String action = intent.getAction();
            if (action.equals("one_brodest")){
                Toast.makeText(context, "发送了一个广播", Toast.LENGTH_SHORT).show();
            }
        }
    }
3.创建完广播接受者以后注册广播,并且添加一个action
//新建intentFilter对象 通过addAction添加广播
     IntentFilter intentFilter = new IntentFilter();
     intentFilter.addAction("one_brodest");
4.然后注册一个广播
//注册广播
     MyBrodestReciver myBrodestReciver = new MyBrodestReciver();
     registerReceiver(myBrodestReciver,intentFilter);
5.到这里广播的注册已经完成接下来就是使用了
//做一个点击事件发送一个广播
send.setOnClickListener(new View.OnClickListener() {
@Override
public void onClick(View v) {
Intent intent = new Intent();
intent.setAction("one_brodest");
sendBroadcast(intent);
}
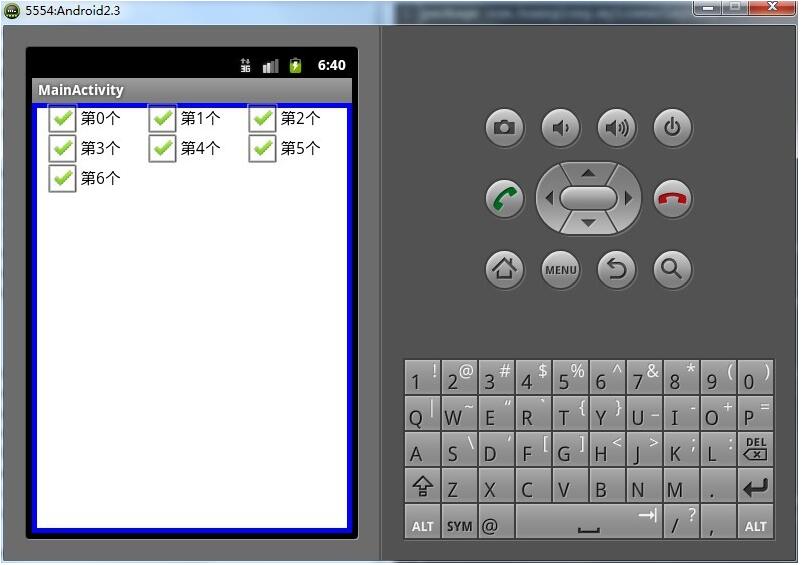
});6.这就是点击之后的效果,成功发送了一个广播!!!!!!!!!!!!!!!

7.最后一步,销毁广播
@Override
    protected void onDestroy() {
        super.onDestroy();
        //销毁广播
        unregisterReceiver(brodestReciver);
    }
到此这篇关于Android studio 广播的简单使用的文章就介绍到这了,更多相关Android studio 广播内容请搜索编程学习网以前的文章希望大家以后多多支持编程学习网!
织梦狗教程
本文标题为:Android studio 广播的简单使用代码详解


基础教程推荐


猜你喜欢
- Flutter手势密码的实现示例(附demo) 2023-04-11
- iOS开发教程之XLForm的基本使用方法 2023-05-01
- IOS应用内跳转系统设置相关界面的方法 2022-11-20
- IOS 播放系统提示音使用总结(AudioToolbox) 2023-03-01
- Android中的webview监听每次URL变化实例 2023-01-23
- Flutter绘图组件之CustomPaint使用详解 2023-05-12
- Android开发使用RecyclerView添加点击事件实例详解 2023-06-15
- android studio按钮监听的5种方法实例详解 2023-01-12
- 解决Android Studio突然不显示logcat日志的问题 2023-02-04
- Android多返回栈技术 2023-04-15