这篇文章主要介绍了Android沉浸式顶部实现代码及效果,文中通过示例代码介绍的非常详细,对大家的学习或者工作具有一定的参考学习价值,需要的朋友可以参考下
研究了下这个,记录下代码。
主页面代码:activity_main.xml
<?xml version="1.0" encoding="utf-8"?>
<android.support.constraint.ConstraintLayout xmlns:android="http://schemas.android.com/apk/res/android"
  xmlns:app="http://schemas.android.com/apk/res-auto"
  xmlns:tools="http://schemas.android.com/tools"
  android:layout_width="match_parent"
  android:layout_height="match_parent"

  tools:context=".MainActivity">

  <TextView
    android:layout_width="match_parent"
    android:layout_height="70dp"
    android:text="Hello World!"

    android:gravity="center"
    android:background="@color/colorAccent"
    app:layout_constraintLeft_toLeftOf="parent"
    app:layout_constraintRight_toRightOf="parent"
    app:layout_constraintTop_toTopOf="parent" />
  <!-- android:fitsSystemWindows="true" android:clipToPadding="true"-->
</android.support.constraint.ConstraintLayout>
添加三个文件:三份 style 文件,即默认的values(不设置状态栏透明)、values-v19、values-v21(解决半透明遮罩问题)。
values 下 style.xml
<style name="TranslucentTheme" parent="AppTheme">
    <!--在Android 4.4之前的版本上运行,直接跟随系统主题-->

  </style>
values-v19 下 style.xml
<?xml version="1.0" encoding="utf-8"?>
<resources>
  <style name="TranslucentTheme" parent="Theme.AppCompat.Light.NoActionBar">
    <item name="android:windowTranslucentStatus">true</item>
    <item name="android:windowTranslucentNavigation">true</item>
  </style>

</resources>
values-v21 下 style.xml
<?xml version="1.0" encoding="utf-8"?>
<resources>
  <style name="TranslucentTheme" parent="Theme.AppCompat.Light.NoActionBar">
    <item name="android:windowTranslucentStatus">false</item>
    <item name="android:windowTranslucentNavigation">true</item>
    <item name="android:statusBarColor">@android:color/transparent</item>
  </style>

</resources>
这里需要在:AndroidMainfest.xml 里添加样式。
<?xml version="1.0" encoding="utf-8"?>
<manifest xmlns:android="http://schemas.android.com/apk/res/android"
  package="controller.hzl.com.dingbu2">

  <application
    android:allowBackup="true"
    android:icon="@mipmap/ic_launcher"
    android:label="@string/app_name"
    android:roundIcon="@mipmap/ic_launcher_round"
    android:supportsRtl="true"
    android:theme="@style/AppTheme">
    <activity android:name=".MainActivity"
      android:theme="@style/TranslucentTheme"
      >
      <intent-filter>
        <action android:name="android.intent.action.MAIN" />

        <category android:name="android.intent.category.LAUNCHER" />
      </intent-filter>
    </activity>
  </application>

</manifest>
主Acitivity没有修改。
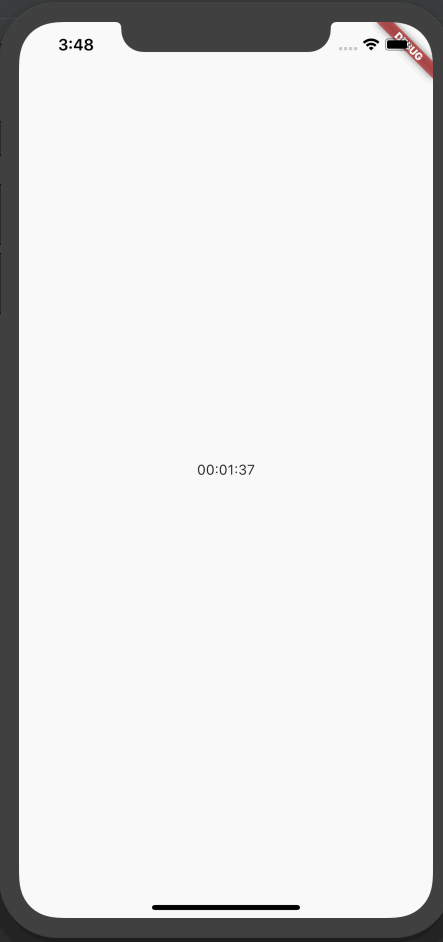
效果图:

以上就是本文的全部内容,希望对大家的学习有所帮助,也希望大家多多支持编程学习网。
织梦狗教程
本文标题为:Android沉浸式顶部实现代码及效果


基础教程推荐


猜你喜欢
- Flutter绘图组件之CustomPaint使用详解 2023-05-12
- IOS 播放系统提示音使用总结(AudioToolbox) 2023-03-01
- iOS开发教程之XLForm的基本使用方法 2023-05-01
- Android开发使用RecyclerView添加点击事件实例详解 2023-06-15
- Android中的webview监听每次URL变化实例 2023-01-23
- IOS应用内跳转系统设置相关界面的方法 2022-11-20
- 解决Android Studio突然不显示logcat日志的问题 2023-02-04
- android studio按钮监听的5种方法实例详解 2023-01-12
- Android多返回栈技术 2023-04-15
- Flutter手势密码的实现示例(附demo) 2023-04-11