本文详细讲解了Flutter实现Text完美封装,文中通过示例代码介绍的非常详细。对大家的学习或工作具有一定的参考借鉴价值,需要的朋友可以收藏下,方便下次浏览观看
使用惯了android的布局,对Flutter的组件和布局简直深恶痛绝啊,于是下定决心,一点一点封装Flutter的基础组件,今天封装的是Text组件,自认为封装的非常完美,完全可以用android布局的写法来写Text了,而且可以直接设置margin,padding,color,font,等等所有的属性,只需要一行代码就能实现,废话不多说,先看效果

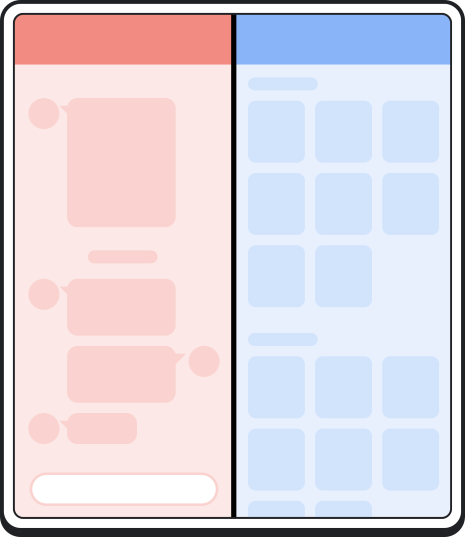
我们可以看到,颜色,边框,圆角通通都设置完成了,还有其他的属性,就不都一一展示了,实现这个效果需要哪些代码呢?看下面
TextView(
            "自定义textview自定义textview自定义textview自定义textview自定义textview",
            backgroundColor: Colors.red,
            textColor: Colors.white,
            padding: 10,
            cornerRadius: 10,
            borderColor: Colors.yellow,
            borderWidth: 1,
            marginTop: 5,
            singleLine: false,
          )
是的,跟android布局的方法完全一样,再也不用嵌套container再也不要写什么style了!!!
具体的封装实体类如下,为了纪念android,我叫他TextView,具体属性参考代码里面,应该都很简单易懂吧
import 'package:flutter/material.dart';

class TextView extends StatelessWidget {
  double? padding = 0;
  double? margin = 0;
  double? paddingLeft = 0;
  double? paddingRight = 0;
  double? paddingTop = 0;
  double? paddingBottom = 0;
  double? marginLeft = 0;
  double? marginRight = 0;
  double? marginTop = 0;
  double? marginBottom = 0;
  double? fontSize = 0;
  Color? textColor = Colors.black;
  Color? backgroundColor = Colors.white;
  AlignmentGeometry? alignment = Alignment.center;
  double? cornerRadius = 0;
  double? borderWidth = 0;
  Color? borderColor = Colors.white;
  String content = "";
  bool? singleLine = false;
  bool? isBold = false;

  TextView(this.content,
      {this.textColor,
      this.backgroundColor,
      this.padding,
      this.paddingTop,
      this.paddingBottom,
      this.paddingRight,
      this.paddingLeft,
      this.cornerRadius,
      this.borderColor,
      this.borderWidth,
      this.marginBottom,
      this.marginLeft,
      this.marginRight,
      this.marginTop,
      this.margin,
      this.fontSize,
      this.singleLine,
      this.isBold}) {
    if (padding != null) {
      if (padding != null && padding! > 0) {
        paddingLeft = padding;
        paddingRight = padding;
        paddingBottom = padding;
        paddingTop = padding;
      }
    }

    if (margin != null) {
      if (margin != null && margin! > 0) {
        marginLeft = margin;
        marginTop = margin;
        marginRight = margin;
        marginBottom = margin;
      }
    }
  }

  @override
  Widget build(BuildContext context) {
    return Container(
      margin: EdgeInsets.fromLTRB(this.marginLeft ?? 0, this.marginTop ?? 0,
          this.marginRight ?? 0, this.marginBottom ?? 0),
      decoration: new BoxDecoration(
        border: new Border.all(
            width: this.borderWidth ?? 0,
            color: this.borderColor ?? Colors.white),
        color: this.backgroundColor,
        borderRadius:
            new BorderRadius.all(new Radius.circular(this.cornerRadius ?? 0)),
      ),
      padding: EdgeInsets.fromLTRB(this.paddingLeft ?? 0, this.paddingTop ?? 0,
          this.paddingRight ?? 0, this.paddingBottom ?? 0),
      child: Text(
        content,
        style: TextStyle(
            color: this.textColor,
            fontSize: this.fontSize ?? 14,
            fontWeight:
                this.isBold ?? false ? FontWeight.bold : FontWeight.normal,
            overflow: this.singleLine ?? false
                ? TextOverflow.ellipsis
                : TextOverflow.clip),
      ),
    );
  }
}
到此这篇关于Flutter完美封装Text的文章就介绍到这了。希望对大家的学习有所帮助,也希望大家多多支持编程学习网。
织梦狗教程
本文标题为:Flutter实现Text完美封装


基础教程推荐


猜你喜欢
- Android中的webview监听每次URL变化实例 2023-01-23
- Flutter绘图组件之CustomPaint使用详解 2023-05-12
- iOS开发教程之XLForm的基本使用方法 2023-05-01
- Android开发使用RecyclerView添加点击事件实例详解 2023-06-15
- android studio按钮监听的5种方法实例详解 2023-01-12
- 解决Android Studio突然不显示logcat日志的问题 2023-02-04
- IOS 播放系统提示音使用总结(AudioToolbox) 2023-03-01
- Flutter手势密码的实现示例(附demo) 2023-04-11
- IOS应用内跳转系统设置相关界面的方法 2022-11-20
- Android多返回栈技术 2023-04-15